
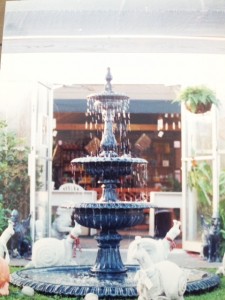
Shiny and new…
The old iron fountain had seen better days; that’s for sure. Many, many years ago (over 20 now) it was the star of a brand new garden shop, and its place of prominence was at the very center of the entrance…the shiny black finish was reflected in the pool of water filling the large, shallow basin.
Maybe some of you remember when you had to walk around it, in all its glory, to reach the greenhouse. Though I have to say I wasn’t overly fond of the giant snails in this old photo!
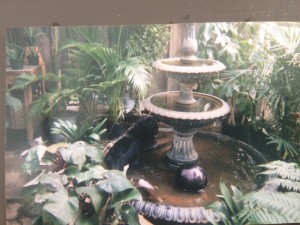
Can you see the dog in the fountain?
The beautiful fountain was a fixture it seemed. Soon, the neighborhood dogs discovered the cool water in the large basin – it was a common sight to see a large lab or some other dog (Where did they come from anyway?) lolling in the water, tongue out, happy, happy.
Keeping the fountain filled was a chore, and we quickly discovered a definite flaw in the design. The basin was too shallow to hold enough water – ever! So, to keep the fountain running consistently, we had to fill it continuously. Boy, the dogs really loved that. They kept coming…cool, running water any time they wanted it – such a treat!
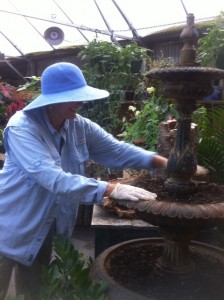
planting begins….
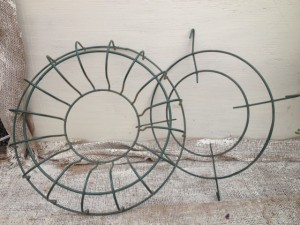
After many years of fighting this, we decided to move the fountain into the greenhouse, but after one disastrous attempt to use it for a glorified goldfish pond (Note: Goldfish do not like iron or rust.), we finally gave up and it met it’s inglorious fate stored under a table…the enormous basin turned upside down and covered with plastic. The top tiered portion ended up outside, leaning precariously on its side, a sad sight for anyone who remembered it in its heyday.

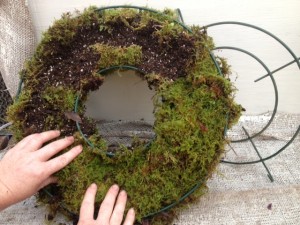
I’d been wanting to move the top portion and plant it, but busy seasons came and went and there just didn’t seem to be the time or inclination (It is a very heavy piece of iron!). This summer, though, Jamie found the perfect spot in the greenhouse, and I planted it up. It has a new life once again as a fixture of Oak Street Garden Shop!
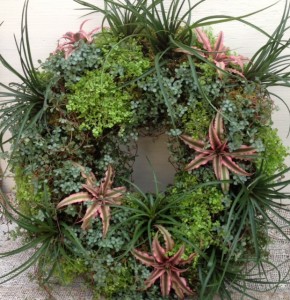
Because the three basins are designed to hold water, the plants needed to be those that don’t mind moisture. I also wanted to have enough plants cascading to create a “fountain” effect, as well as some to create fullness but not get too large. We’ll see how it grows out.
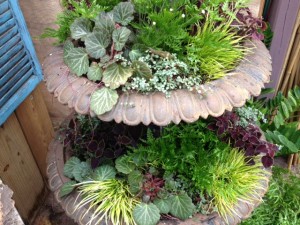
Saxifraga stolonifera, strawberry begonia, was the first plant I chose. These are wonderful perennial groundcovers in moist, shady spots of the garden. Hopefully they will spread and cascade over the edge happily in their new home.
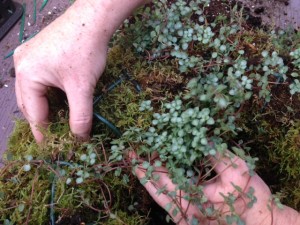
Next I added a dark leaved trailing coleus. Yes, there is a coleus that really spills! In addition, I tucked in a bit of pilea ‘Aquamarine’ – this plant seems to be able to grow in any conditions and I’m testing it here to see how it does. That’s one of the luxuries of working in the greenhouse – we can always substitute another plant if need be!
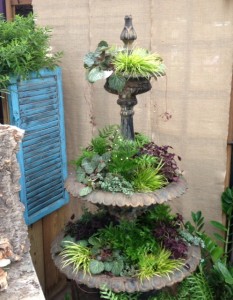 One of the filler plants I used was a tiny grass, Acorus minimus – all the acorus love moisture so it should do well. I rounded out the filler plants with a few ferns and another bog plant called Syngonanthus chrysanthus ‘Mikado’. This is a definite test since we know next to nothing about this plant; however, the fountain basin should give it the boggy conditions it is supposed to prefer!
I’m glad the fountain has a new life and hope the planting grows out the way I envision it. The large basin is in yet another new spot outside, leaning against a sturdy wall. Hmmm… what next for it , I wonder? Only time will tell.
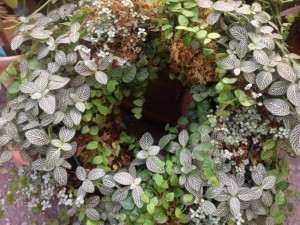
 This summer’s wet, cool weather might have kept many of you out of your gardens, but we’ve managed to stay busy in the greenhouse putting together arrangements filled with orchids, succulents, houseplants, and so much more…here’s a peek at some of them. We regularly have folks who stop in just to see what we’ve been working on! All of these arrangements are composed of live plants, no cut flowers here.
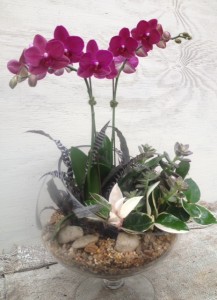

 Finally, the silver container was given in memory of someone…the longlasting and low maintenance houseplants of trailiing pepperomia and cryptanthus make excellent companions. It’s gratifying, also, to know that whoever is on the receiving end will be able to enjoy this longer than a fresh flower arrangement could ever hope to last.
 I’m not quite sure I’ve been living in the Southeast this summer…plentiful rain and decent temperatures – (Though it looks like the heat is finally returning.) this has been Alabama in August?!
 But, if your garden and beds are struggling…think about where you’d like to see marigolds, ornamental peppers, late season salvias, and, further down the road, lettuce, asters and cool season herbs – we’ll have transplants of parsley, thyme (Look for the lemon variegated thyme which looks beautiful with green or red lettuce and marigolds.) dill and cilantro too.
 For all of you
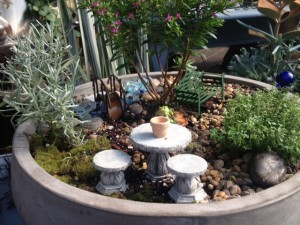
 Some people have asked why we don’t carry fairies and other inhabitants for our miniature gardens. For us, the garden is the key – creating a miniature garden world with plants that actually will grow for you…along with some judicious clipping when needed. (Fairies are there in spirit, not seen, and, if the garden has the magic of the creator’s touch, of course they’ll come.)
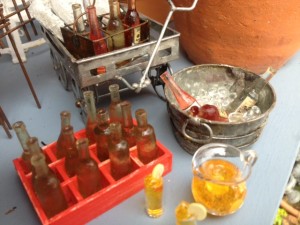 These miniature gardens have really struck a chord for adults and kids alike, and it’s so much fun to see the delight by adults and excitement of little ones as they browse (and play with) the tiny creations that can be used in their own gardens. Of course, any activity that stimulates imagination is certainly worthwhile! For children, it’s a make believe world; for adults it’s an outlet to grow plants in a different way.
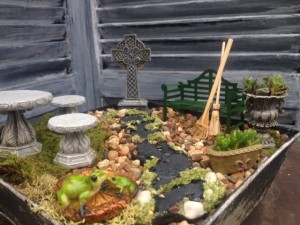 All was well until the night the little girl had a sleepover party with a couple of her friends…you might well imagine where this story is going! Somehow the miniature garden, which she kept in her bedroom, was completely up-ended in the middle of the bed, an utter mishmash of soil, plants,pea gravel, stones and little accessories. It must have been like Humpty Dumpty falling off the wall in the fairytale! We helped rework the little miniature garden, and hopefully that little girl is still happily raking her pea gravel “path”…
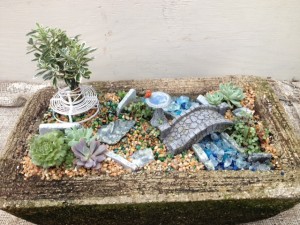 Not long ago a parent, her daughter, and the girl’s little brother came in. The mother marched to the counter with the little boy and said that he needed to buy, with his own money, a stone for his sister’s miniature garden. Puzzled, I asked what kind of stone he needed. Well, the mother said, her daughter had a stone with the words “My Garden” written on it in her miniature garden. Evidently the little boy had turned it around and scrawled “bathroom” on the back! Of course, the boy’s sister wasn’t having any of that in her garden. So, we found the perfect stone, wrote “My Garden” on it for the little girl, and the little boy brought out his money to pay for it. Before they left, the mother gave the little boy the stone that he’d written on. Much later we found it hidden in the miniature garden displays and had a good laugh….he didn’t want it either!
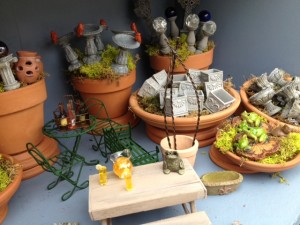 Some of the fun things we’ve gotten in recently include a pair of ghosts (It’s never too early to begin thinking about Halloween!), wooden soda bottle crates with soda bottles, a wine basket with wine bottles, a metal tub (just right to put the wine and soda bottles in!), tiny turtles, frogs and one very fat cat, some pretty urns, a very realistic Celtic cross, a stone walking bridge, a triple trellis and more. And there will be additional miniature garden items coming in down the road too. It’s a good idea to pop in every now and then to see what’s new.
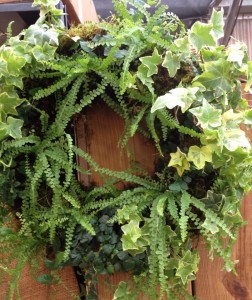

 This post is all about relaxing in your garden. Yes, I said relaxing…it’s late summer and the garden is buzzing with life – or should be. Hopefully we’ve helped you create the perfect habitat for beneficial and beautiful insects and other critters. Take a stroll every so often and really see all that’s happening in their home.
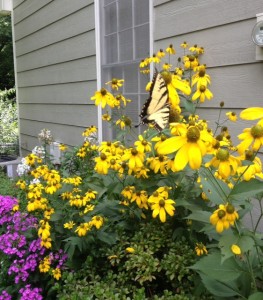
 I’ve also seen a few swallowtail butterflies – graceful beacons of midsummer, moving from pentas to zinnia to dahlia and back -.and one that had somehow torn its wing and that I found the next day in tatters in one of my beds. The circle of life continues…

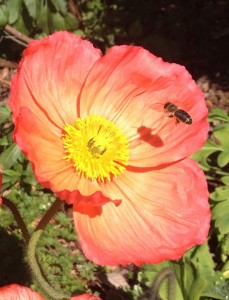 I somehow captured the most perfect shot of a honeybee going in for a landing on a poppy this past spring. We need to be mindful of the bees…I’m thankful when I see them happily moving from one bloom to another on the vitex in June or the salvias in August.